Looking to set up your own Rust server without spending a fortune, right?
I've been down that road, and let me tell you, it's not as straightforward as it sounds. You're probably worried about the costs climbing up or getting messed up in all the technical stuff needed to get your server off the ground.
But what if I told you there's a way out?
Imagine setting up your server so smoothly, it feels like everything just clicks into place.
You could create a unique spot in the Rust world that players are drawn to, not just for the gameplay but for the community you've built.
I know what you're thinking – it sounds great, but there's always that nagging fear in the back of your mind.
What if your server becomes infamous for being down more than it's up, or worse, it becomes a target for security threats?
Let's tackle this head-on. I'm here to help you navigate through these challenges. We're not just aiming to avoid the pitfalls; we're looking to create a Rust server that's perfect for gamers looking for an epic experience, all without breaking the bank.
In case you want to set up a more reliable, scalable, and accessible Rust server, the cloud service method can be a better bet as compared to the DIY method.
Gamers with limited technical expertise can opt for this easy yet step-pronged solution.

If you don’t want to know about the easy way to host a Rust server, skip this section and continue with the tutorial.
But if you’re interested, here’s the deal:
Hosting your own Rust server is a great way to learn the game, create base designs, practice, and have fun with a few friends.
It’s also a pain in the ass to manage, and takes a while to setup.
But there’s another problem:
When you host the server on your own PC, it’s going to consume your resources. Your computer not only has to run the game, it also has to run the server and manage everyone connected to the server.
Dedicated Rust server hosting is taxing on your system’s performance, not to mention your internet bandwidth. There are ways to improve your internet speed, but nothing you do will be enough to host more than 5-10 people on the server.
Furthermore, your friends can only connect to the server when it’s running on your PC, meaning you’d have to leave your computer on 24/7 to have a real Rust server that actually attracts a player base.
If you want to have a real Rust server that can accommodate dozens of people and run 24/7 without compromising performance, paying for Rust server hosting is the way to go.
It’s cheap, fast, and easy. Plus, it’s the only way you’ll be able to host a real Rust server. If you want to host a Rust server the easy way, check out our guide on the best Rust server hosting companies.
If you want to host a Rust dedicated server the easy way, you’re better off investing a small amount to pay for a dedicated server.
There are tons of cloud-based service providers that you can use to run a Rust server. In most cases, the obvious picks include the following:
You should pick one depending on the player count and server complexity. As for pricing, there are several elements to consider.
For instance, AWS offers a 12-month free program and free trails, S3 storage support, and other perks. Other service providers that offer similar credits and trial packs make better bets.
If you are in the market for cost-effective solutions, it is better to opt for burstable CPU options, including the AWS T-series or the Azure B-series.
Finally, you can pick depending on what kind of pricing you are comfortable with. From long-term commitments to Pay-as-you-Go services, there are several options to choose from. Do note that the best Rust server hosting provider depends on your requirements.
Even though this isn’t DIY, you would still need to set up a server. Here are the associated steps:
Step 2.1: Create a VM instance (as the process involves creating a virtual machine)
You can choose the VM instance based on the OS you prefer.
Step 2.2: Configure
Even though the cloud service takes care of most elements, you still need to configure it for optimal performance. For Windows, it is about choosing VMs with at least four vCPUs and 8GB RAM in case you wish to create a small-to-medium Rust server. You can scale the hardware accordingly.
For Linux, you can scale similarly, but as the overheads are lower, you might be able to set up larger Rust servers with a bit less power. The SSD component in both cases should be around 100GB as the starting point.
Pro Tip: Rely on tools like Chef, Puppet, and Ansible to streamline the server setup process. These tools allow you to define the server configuration in the form of code, ensuring that you can apply updates and replicate setups with ease.
Another aspect of configuration is network configuration, which involves the following steps:
It is now time to install the server and make it usable to the gamer community. Here are the sub-steps involved:
ssh username@your_vm_ip. Here, the username and your_vm_ip are the ones you would set in the first place while interacting with the VM.Connecting VM to SSH allows you to access the cloud-based VM from any local PC.
I would be using Xshell as the SSH tool.
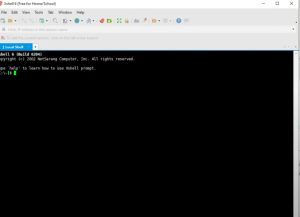
Updating lists and installing SteamCMD:
As you would be running the VMs remotely, updating package lists will refresh the same and ensure that you have the latest tools to play with. The features steps include:
sudo apt update for the Linux distro.sudo apt install steamcmdYou can get all the details as part of Linux’s Game Server interface.
Once installed, you will still need to download the Rust server files, customize the server settings, and even create a startup script to run the VM seamlessly on the local PC. Here are the associated steps:
steamcmd in the command line interface.force_install_dir/path/to/rust_server/, replacing the last bit with the actual path name.app_update 258550 validate commandquitTo edit the server files, follow along:
Then, you need to create a startup script to ensure seamless functioning. The steps include:
#!/bin/bash

./RustDedicated -batchmode +server.port 28015 +server.level "Procedural Map" +server.worldsize 3000 +server.maxplayers 100 +server.hostname "Your Server Name" +server.identity "my_rust_server" +rcon.port 28016 +rcon.web 1 +rcon.password "yourpassword"
chmod +x start.sh./start.sh script from the server directory.How to make your own Rust server for free isn’t only about connecting with a service provider and connecting the VM to the local PC. You also need to account for the security aspect. Here are the associated steps to configure the security groups and elements:

Do note that online gameplay can make the system or even server vulnerable to Distributed Denial of Service attacks. However, these risks can be handled by:
Note: To protect the SSH or the local PC, you can use tools like fail2ban. Also, while configuring the Rust server settings, doing the same inside a Virtual Private Cloud or VPC makes sense as it isolates and allows you to launch resources without security concerns.

Here are all the additional command line options and prompts, in case you are unsure as to how the same works:
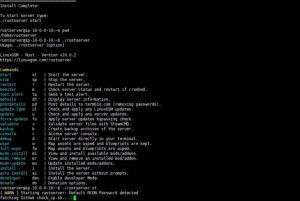
Once you have set up the Rust server, along with the security considerations, it is time to launch the same. Here are the associated steps:
start.sh for Linux and StartServer.bat for Windows.To maintain the server, you should initiate routine checks and set automated backups by tweaking a few settings at the cloud service provider’s end. However, to initiate regular updates, you need to log into the server using SSH, run SteamCMD using the command line, and type in app_update 258550.
And that should take care of free Rust server hosting (provided you sign up using a trial plan).
If you prefer hands-on experience with the server while being able to control and customize even the smallest of server requirements, the DIY method can be useful.
This method makes sense if you are a true gaming enthusiast and interested in hosting games for a group of friends, all while focusing on unique environments.
Hardware requirements:
Software prerequisites:
Do note that having a Windows OS isn’t compulsory. If you are more familiar with the Linux ecosystem, the following software prerequisites might make sense:

(I tested using the Ubuntu 22.04.3 LTS version)
Following these hardware and software prerequisites can help you with Rust customization and control needed for adjusting elements like day/night cycles during gaming, player-vs-player settings, and even moderating the player base by enforcing specific rules.
To set up the Rust server via the DIY method, you first need to zero in on the OS.
If on Windows, the steps involve:

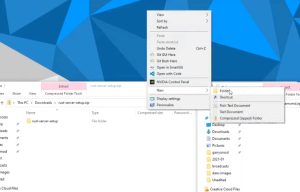
steamcmd.exe which would then complete the installationFor Linux, follow the mentioned steps:
sudo apt install steamcmd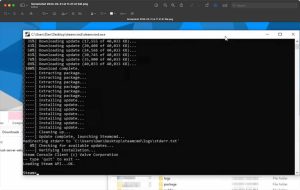
While setting up the server is crucial, creating an update script is as important. This way, you can keep your server updated with new patches and game updates, without having to manually do the same. The update process is automated and differs based on the OS in play:
For Windows, you need to open the notepad and type in the following commands:
@echo off

start /wait C:\SteamCMD\steamcmd.exe +login anonymous +force_install_dir C:\RustServer\ +app_update 258550 validate +quit

echo Rust server has been updated.
Note: You can update the paths (C:\SteamCMD or the C:\RustServer, depending on the names you have selected)
Once you have typed in the code, save the Notepad file using the .bat extension. After that, whenever you want to update the server, simply right-click on the .bat file and select “Run as administrator” to get the process underway.
For Linux, the first step would be to open the terminal and then use Vim, nano, or any other text editor. Or, you can simply type in “nano update_rust_server.sh” to create a script file.
Once done, type in the following code into the editor: (Linux only)
#!/bin/bash

/path/to/steamcmd/steamcmd.sh +login anonymous +force_install_dir /path/to/rust_server/ +app_update 258550 validate +quit

echo "Rust server has been updated."
Do note that the path names can vary depending on where you wish to have the same on your computer. Once you type in the editor, make the same executable by running the following command:
chmod +x update_rust_server.sh
Once done, you can simply type in the following command to execute the update script whenever you feel like it!:
./update_rust_server.sh
Notably, having an update script handy is convenient and efficient.
Post the update-script discussion, it is necessary to download the server files. This process initiates immediately after you have installed SteamCMD. Post-installation, you can launch the SteamCMD, use “login anonymous as the command, type in app_update 258550 validate and download the server files. This process remains the same for Windows and Linux.
Note: You can download the pre-defined Rust server setup, open the same to access the batch file, and then move it into the directory folder of the SteamCMD.
Once you have set up the server, using the steps mentioned above, you would want to customize the same better. This way, you can get the most out of the gameplay. And the process isn’t as complicated. The idea is to create standard startup scripts, enabling remote server management and utilizing tools for continuous server operation.
Phase 1: Creating the startup script
The process varies for Windows and Linux. Let us address both scenarios:
For Windows:
RustDedicated.exe -batchmode +server.ip 0.0.0.0 +server.port 28015 +server.tickrate 30 +server.hostname "Your Server Name" +server.maxplayers 50 +server.worldsize 3000 +server.saveinterval 300 +server.identity "my_server"
You can customize the parameters like .hostname, .maxplayers, and .worldsize components depending on your preferences.
For Linux:
#!/bin/bash

./RustDedicated -batchmode +server.ip 0.0.0.0 +server.port 28015 +server.tickrate 30 +server.hostname "Your Linux Server Name" +server.maxplayers 50 +server.worldsize 3000 +server.saveinterval 300 +server.identity "linux_server"
Phase 2: Enabling Web RCON
If you wish to install Rust on Windows, you are better off installing the Web-based RCON or the Remote Console. As the name suggests, this helps administer and manage the Rust server remotely via the web interface.
To include the same, head over to the .bat file that you created in the first place and add the following parameters:
+rcon.web 1 +rcon.ip 0.0.0.0 +rcon.port 28016 +rcon.password "your_rcon_password"
You can even use third-party shared server tools like GameServers to activate web RCON.

Phase 3: Making the Script Executable
Just like how you would prepare an executable update script, the config script also needs to be made executable in case you want it to run in the background. To do the same in Linux, use the command line to run the following:
chmod +x StartServer.sh
Another aspect while trying to work with Linux is to use the tmux or screen tools to ensure that the processes related to configuration can seamlessly run in the background. To use tmux, which is a more convenient option, install tmux using the package manager. Do note that tmux can also be used with Windows.
Once tmux is installed, start a session using the following command: Tmux new -s rust_server
Post that, run /StartServer.sh.
You can detach yourself from the process once it's done by typing ctrl and b and then d. To configure the background settings, you can always reattach using the following command:
tmux attach-session -t rust_server
One of the many Rust server requirements would be to ensure that it goes live. Here is how to take care of the same:
Step 3.1: Port forwarding (this method allows others to join in)
This step allows you to connect or redirect game traffic from the internet to the Rust server. Here is how you can go about the same:
URL: 192.168.1.1 or something relevant.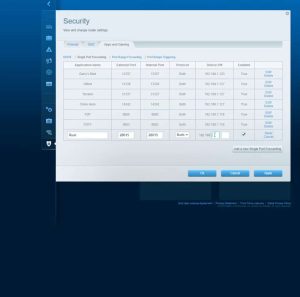
Once the rule changes are made, apply and save the changes.
You can use the command line prompt to find the router details and other insights:
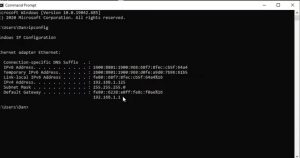
Step 3.2: Configuring the firewall
This step is necessary to allow traffic movement to the specific ports. Here are the associated steps:
sudo ufw allow 28015/udp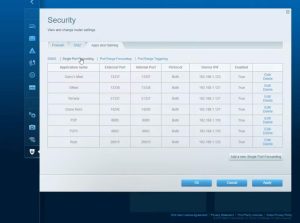
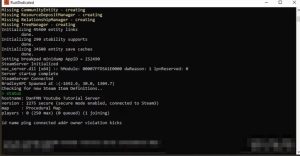
To live, open the Rust app, type F1 to get access to Rust’s command line interface and type in the following command connect localhost: 28015
Feeding the command > status gives you the status of the server, like the number of active players and more.
If you wish to opt for the DIY way of free Rust server hosting, you also need to take care of server maintenance and updates. These include the following steps:
4.1 Focus on regular updates.
Focusing on regular updates is necessary if you wish to maintain and run servers. Here is the command to process the same:
steamcmd +login anonymous +force_install_dir /path/to/rust_server/ +app_update 258550 validate +quit
This command lets you log in anonymously, checks for updates and installs the same.
4.2 Automating updates
On Windows, you can train the task scheduler to take care of automatic updates. And on Linux, you can automate the same using the “cron” job.
4.3 scheduling backups
To schedule backups, it is necessary to locate the data directories and use tools like “rsync” to sync the server data with the existing backups.
By now, most of the DIY concerns related to Rust's private server setup should be taken care of. However, you should take care of the possible issues and the strategies to handle them. Some of the more obvious issues include configuration errors, server crashes, and connectivity concerns. In some cases, the server might not even be visible in the game list. To combat the same, the possible troubleshooting ideas include:
It is advisable to consult the server logs while troubleshooting, as you can get detailed insights related to server operations and errors.
Here’s a list of batch file commands for Rust servers and what they do:
If you plan on trying to turn your dedicated server into a public masterpiece there are a couple of routes you can take to promote your server.
First of all, before you put it out for the world to see, come up with a catchy server name and description for players to see on the server list. You can even change the loading picture to make your server stand out from the rest.
Second, take advantage of all the online resources at your disposal. Forums like the official PlayRust and Rust Server Directory subreddits are great places to start.
You can also post on Rust’s official discord server and try to garner a following there. If officiality isn’t your thing, there are hundreds of player-ran servers out there to advertise on.
Each type of hosting has its own tradeoffs. Use these pros and cons to choose whichever fits your Rust server needs best.
Dedicated hosting, for the most part, is best for when you want to host a small server with a couple of friends.
Trying to grow past that small player count is difficult with the limited resources that your PC and internet can provide.
Pros:
Cons:
While you have to pay a monthly fee to use the service, purchasing a host allows you to run much bigger and faster servers than you ever can on a dedicated connection.
Pros:
Cons:
The cheapest way to host a Rust server is by using an old PC. Once there, you can rely on shared game server hosting plans or even subscribe to the free tiers offered by the cloud providers. Another approach would be to get community funding — from individuals who would be using the server to play.
To host a solo Rust server, you would need your own hardware. Or, you can even rely on the paid plans offered by cloud service providers like Azure and AWS. In the DIY method, you need to install the Rust server files using SteamCMD.
For setting up a small server, 8GB RAM is sufficient. In case you wish to set up a medium-sized unit with standard maps and a decent player count, 16GB is recommended. For large servers, 32GB ensures optimal performance.
For the standard do-it-yourself approach, there aren’t any overheads except the internet costs. However, if you wish to install a server using dedicated server providers, which would also take care of DDoS threats, you need to spend anywhere between $10 to $100. For standard cloud hosting, $20 to $200 can be the associated cost, while for shared hosting, you can start as low as $10.